HPE Aruba Networking의 유선 메인스트림은 AOS-CX 스위치입니다.
전통적인 스위칭 기능을 넘어서 마이크로서비스 아키텍처를 통해 클라우드 네이티브를 지향하고 있는 제품입니다.

내부에 자체적인 데이터베이스를 통해 여러 메트릭과 로그를 실시간적으로 모니터링하고 분석할 수 있을 뿐만 아니라 스위치 모든 기능에 대해서 100% REST API를 지원하여 Ansible이나 Python 등을 통해 대량의 스위치를 원격에서 자동화 작업할 수 있도록 합니다.

기본적인 명령어(Command) Syntax는 Cisco 장비와 유사합니다.
하지만 소프트웨어적인 기능 차이가 있기 때문에 일부 명령어는 다를 수가 있어 아래 내용을 통해 확인해보시면 좋겠습니다.
스위치 콘솔 연결
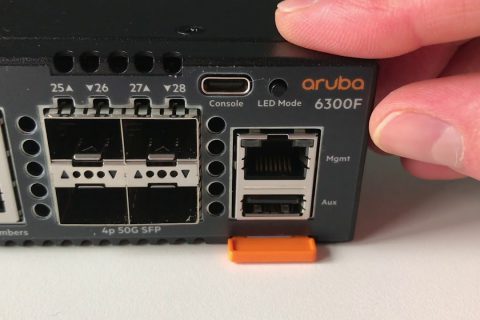
AOS-CX 스위치에는 초기 구성에 사용하거나 배포 후 필요에 따라 사용할 수 있는 콘솔 케이블이 있습니다.
AOS-CX 제품에 따라 콘솔 포트의 인터페이스 유형은 RJ-45나 USB-C 또는 둘 다일 수 있습니다.
터미널 설정 방법은 인터페이스 타입과 상관없이 동일합니다.
- 스위치 콘솔포트와 노트북을 콘솔 케이블을 사용하여 연결합니다.
- 노트북의 터미널 에뮬레이터(Putty 등)을 실행하여 아래와 같이 설정합니다.
- Speed: 115200 bps
- Data Bits: 8
- Stop Bits: 1
- Parity: None
- Flow Control: None
- 터미널이 연결되면, 기본 관리자(default admin) 계정을 사용하여 로그인하라는 메시지가 표시됩니다.
Enter 키를 누르게 되면, 비밀번호를 설정하라고 표시됩니다.
switch login: admin

This account has no password hit enter to proceed:
Password:
스위치를 안전하게 운영하기 위해서는 비밀번호를 설정하여 보호해야 합니다. 비밀번호는 *, &, !, -, _, ? 등의 다양한 특수문자를 포함하여 ASCII 32~127 범위의 영문과 숫자를 조합하여 최대 32자까지 설정할 수 있습니다.
Please configure the 'admin' user account password.
Enter new password: *******
Confirm new password: ******
비밀번호 설정이 완료되면, #로 표시된 관리자 컨택스트로 로그인됩니다.
switch#관리용(mgmt) 인터페이스 설정
스위치를 원격에서 관리하기 위해서는 스위치의 IP주소를 설정하고 원격에서 접속할 수 있도록 해야 합니다.
실제 데이터가 흐르는 네트워크와 분리하기 위해서 관리 인터페이스를 통해 별도의 관리망을 구성하는 것을 권장합니다.
기본적으로 관리 인터페이스는 DHCP 서버에서 자동으로 IP 주소를 얻도록 설정되어 있으며 SSH 사용이 설정되어 있습니다.
네트워크에 DHCP 서버가 없는 경우에는 관리 인터페이스에 고정 주소를 구성해야 합니다.
우선 스위치에 로그인하여 Config 가능한 컨텍스트 상태로 들어갑니다.
switch# configure
switch(config)#
interface mgmt 명령어를 사용하여 관리 인터페이스 컨텍스트로 이동합니다.
switch(config)# interface mgmt
switch(config-if-mgmt)#
현재 관리 인터페이스에 적용된 Config 정보를 확인합니다.
만약 DHCP 서버를 통해 IP주소를 받아왔다면 인터페이스에 IP주소가 표시됩니다.
switch(config-if-mgmt)# show running-config current-context
     interface mgmt
     no shutdown
     ip dhcp
switch(config-if-mgmt)#
DHCP 서버가 연결되어 있지 않다면, 수동으로 IP주소와 게이트웨이, DNS 서버 등의 정보를 입력합니다.
switch(config)# interface mgmt
switch(config-if-mgmt)# ip static 198.168.100.10/24
switch(config-if-mgmt)# default-gateway 198.168.100.200
switch(config-if-mgmt)# nameserver 198.168.100.201
switch(config-if-mgmt)#
Show 명령어를 통해 적용된 Config를 확인합니다.
switch(config-if-mgmt)# show running-config current-context
     interface mgmt
     no shutdown
     ip static 198.168.100.10/24
     default-gateway 198.168.100.200
     nameserver 198.168.100.201
switch(config-if-mgmt)#
적용한 Config를 메모리에 저장합니다.
switch(config-if-mgmt)# write memory
Copying configuration: [Success]
Switch(config-if-mgmt)#
관리 인터페이스에 적용된 명령어는 아래와 같은 명령어를 통해서도 확인 가능합니다.
switch# show interface mgmt
Address Mode                  : static
  Admin State                   : up
  Link State                    : up
  Mac Address                   : 50:00:00:05:00:00
  IPv4 address/subnet-mask      : 192.168.100.10/24
  Default gateway IPv4          :
  IPv6 address/prefix           :
  IPv6 link local address/prefix: fe80::5200:ff:fe05:0/64
  Default gateway IPv6          :
  Primary Nameserver            : 192.168.100.201
  Secondary Nameserver          :
  Tertiary Nameserver           :
switch(config-if-mgmt)#
switch# show run interface mgmt
interface mgmt
no shutdown
ip static 192.168.100.10/24
nameserver 192.168.100.201
switch#AOS-CX CLI 컨텍스트
CLI 컨텍스트는 스위치의 어느 부분을 관리할 수 있는지, 적절한 권한이 있는 사용자가 어떤 명령을 사용할 수 있는지를 제어합니다.
각 컨텍스트 역할별로 사용할 수 있는 권한이 다릅니다.
- Operator: 스위치의 구성정보(config)를 확인할 수 있지만, 변경할 수는 없음
switch> - Manager: 설정 변경 내용을 저장할 필요가 없는 명령. “enable” 모드라고 하며, 관리자 로그인시 기본 모드
switch> enable
switch# diable
switch>- Global Configuration/admin: 스위치의 구성(config)을 변경하는 명령어. 일반적으로 “config”모드라고 함
switch# config
switch(config)# end
switch#
CLI 명령어 사용 방법
AOS-CX 커맨드는 명령어의 약어와 자동완성 모두를 지원합니다.
이 기능을 활용하면 전체 명령어를 다 입력하는 것보다 훨씬 효율적으로 명령어를 구성할 수 있습니다.
커맨드 약어 (Command Abbrevviation)
CLI가 명령을 수락하는 유효한 명령과 일치하는 충분한 글자만 입력합니다.
예제: Manager 컨텍스트에서 conf 까지만 입력하고 Enter 키를 누릅니다.
구성 모드로 전환됩니다.
switch# conf
switch(config)#
커맨드 자동완성 (Command Completion)
명령어의 일부를 입력한 후 Tab 키를 누르면 다음 중 하나가 표시됩니다
- 유효한 명령과 일치하는 문자를 충분히 입력한 경우 CLI는 단어의 나머지 부분을 표시합니다.
switch(config)# int     (hit the TAB key)
switch(config)# interface- 유효한 명령과 일치하는 문자를 충분히 입력하지 않은 경우 CLI는 명령으로 확인하지 않습니다.
Tab 키를 한 번 더 누르면 입력한 문자와 일치하는 명령이 CLI에 표시됩니다.
switch(config)# cl     (hit the TAB key twice)
 class clear clock
switch(config)# cl- 필요한 명령어를 입력하고, 완료된 단어 뒤에 Tab 키를 두 번 누르면 다음에 입력 가능한 CLI에 명령 옵션이 표시됩니다.
switch(config)# clock     (hit the TAB key twice)
     date                 datetime
     time                 timezone
switch(config)#
관리자(admin) 패스워드 변경
관리자 비밀번호를 변경해야 하는 경우가 있습니다. 이럴 때는 아래 명령어를 사용하여 변경 가능합니다.
switch(config)# user admin ?
     authorized-key        Add SSH client's authorized-key.
     group                 Adding user to the group
     management-interface  Configure the management interface through which the user is allowed to access the switch.
     password              Update user password
switch(config)# user admin password ?
ciphertext Update ciphertext password
Plaintext Update plaintext password. switch(config)# user admin password plaintext *****
confirm password:*****
switch(config)#Show 명령어
스위치 config 확인
현재 config가 구성된 전체 명령어 내역을 보기 위해서는 show running-config 명령어를 사용합니다.
switch# show running-config
Current configuration:
!
!Version ArubaOS-CX FL.10.13.0001AV
!export-password: default
hostname 6300-switch1
banner motd !
this text appears before being prompted for a password
!
banner exec !
this text appears after a user has authenticated
!
user admin group administrators password ciphertext AQBapczR2OzhRyRPu/LhfQ3T0uWUJTDQHWkP3R9VYo3g9UbJYwAAAPAuwjkx+ONM6lJL3eOZGWQS9Dje1CdsHQd278NHCLuqmil0gUf+2MnvWx9wuCMT2bGQIDiHCWzCe3dKa+Lge/A0BxyYzLJBKxrh8o+A5VFqDzTf2Da0v2g3/7j06RomlIOQIQ==
clock timezone us/pacific
checkpoint post-configuration timeout 60
vrf EVPN
    rd 192.168.1.1:3
vrf EVPN1
vrf red
ntp server 128.138.140.44
ntp server 128.138.141.172
ntp enable
… … … (abbreviated)
특정 config만 확인하기 위해서는 다음 명령어를 사용하여 확인할 수 있습니다.
6300(config)# sh running-config ?
  aaa               Authentication, Auth and Accounting
  all               Show running config with default values
  app-recognition   Show application recognition information
  bgp               Current running BGP configuration
  client            Show Client tracking details
  container         Show container configuration
  erps              Show ERPS related data
  evpn              Current running EVPN configuration
  external-storage  Show external storage config
  flow              Show IPFIX flow configuration
  flow-tracking     Show flow tracking information
  gbpr              Group-Based-Policy information
  hash              Show SHA-256 hash of the configuration
  interface         Interface information
  … … Abbreviate
  <cr>
파이프(|)를 사용한 필터링
AOS-CX는 다른 스위치와 마찬가지로 파이프(|) 명령어를 사용하여 출력을 필터링 할 수 있습니다.
include, exclude, count, begin, redirection 옵션을 사용할 수 있습니다.
- 인터페이스 상태가 up인 인터페이스만 필터링
switch# sho ip interface | inc up
Interface loopback1 is up
 Admin state is up
Interface loopback2 is up
 Admin state is up
Interface loopback3 is up
 Admin state is up
Interface vlan1 is up
 Admin state is up
Interface vlan2 is up
 Admin state is up
Interface vlan10 is up
 Admin state is up
Interface vlan100 is up
 Admin state is up
switch#- IP 라우팅 테이블에서 loopback 인터페이스 제외하기
switch# sho ip route | exclude loopback
Displaying ipv4 routes selected for forwarding
VRF: default

Prefix    Nexthop         Interface  VRF(egress)Origin/   Distance/Age
----------------------------------------------------------------------------------
0.0.0.0/0   10.10.1.250     vlan1        -        S         [1/0]       02m:00w:
10.10.1.0/24        -       vlan1        -        C         [0/0]        -
10.10.1.100/32      -       vlan1        -        L         [0/0]        -
10.10.2.0/24        -       vlan2        -        C         [0/0]        -
10.10.2.100/32      -       vlan2        -        L         [0/0]        -

Total Route Count : 6
인터페이스에서 명령어 확인하기
? 명령어를 사용하면 show interface로 사용 가능한 모든 명령어 목록을 확인할 수 있습니다.
switch(config-if)# show interface ?
  IFNAME                     Interface name (e.g. 1/1/1)
  IFNAME.ID                  A subinterface name with identifier in the range 1 to 4094
  IFRANGE                    PORT identifier range
  brief                      Show information in brief format
  dom                        Show transceiver diagnostics information
  downshift-enable           Show downshift-enable information
  energy-efficient-ethernet  Show Energy-Efficient Ethernet information
  environment                Show interface environmental information
  error-statistics           Show interface error statistics
  extended                   Show additional interface statistics
  fault-monitor              Show fault monitor information
  flow-control               Show flow control information
  human-readable             Show statistic in human readable format
  lag                        Show LAG interface information
  link-status                Show link status information
  loopback                   Show loopback interface information
  mgmt                       Management interface details
  persona                    Show interface persona information
  physical                   Show physical interface information
  qos                        Show QoS info for all interfaces
  queues                     Show transmit queue information for all interfaces
  statistics                 Show interface statistics
  transceiver                Show transceiver information
  trunk                      View VLAN configuration for trunk interfaces
  tunnel                     Show tunnel interface information
  utilization                Show utilization statistics
  vlan                       Show VLAN interface information
  vxlan                      Show VXLAN interface information
  <cr>
brief 명령어를 사용하면 전체 인터페이스의 정보를 요약할 수 있습니다.
switch(config)# show interface brief
--------------------------------------------------------------------------------------------------------
Port           Native  Mode   Type           Enabled Status  Reason                  Speed   Description
               VLAN                                                                  (Mb/s)
--------------------------------------------------------------------------------------------------------
1/1/1          --      routed 1GbT           yes     up                              1000    --
1/1/2          --      routed 1GbT           yes     up                              1000    --
1/1/3          1       access 1GbT           yes     down    Waiting for link        --      --
1/1/4          1       access 1GbT           yes     down    Waiting for link        --      --
1/1/5          1       access 1GbT           yes     down    Waiting for link        --      --
1/1/6          1       access 1GbT           yes     down    Waiting for link        --      --
1/1/7          1       access 1GbT           yes     down    Waiting for link        --      --
1/1/8          1       access 1GbT           yes     down    Waiting for link        --      --
1/1/9          1       access 1GbT           yes     down    Waiting for link        --      --
…
…
loopback0      --      routed --             yes     up                              --      Switch Control Pl...
loopback1      --      routed --             yes     up                              --      VTEP Source Loopback
vlan1          --      --     --             yes     up                              --      --
vlan2          --      --     --             yes     up                              --      Simulator Lab Upli...
vlan20         --      --     --             yes     up                              --      --
vlan40         --      --     --             yes     down                            --      --
vxlan1         --      --     --             yes     up                              --      --
lag1           1       trunk  --             yes     up      --                      1000    --
lag10          1       access --             no      down    --                      auto    --
lag20          --      routed --             yes     up      --                      2000    --
특정 인터페이스 정보만 보고 싶을 때는 인터페이스를 뒤에 입력하면 됩니다.
switch(config)# show int 1/1/1
Interface 1/1/1 is up
 Admin state is up
 Link state: up for 20 hours (since Thu May 02 02:04:55 UTC 2024)
 Link transitions: 31
 Description:
 Persona:
 Hardware: Ethernet, MAC Address: 88:3a:30:96:5f:80
 MTU 1500
 Type 1GbT
 Full-duplex
 qos trust dscp
 Speed 1000 Mb/s
 Auto-negotiation is on
 Energy-Efficient Ethernet is disabled
 Flow-control: off
 Error-control: off
 MDI mode: MDI
 Rate collection interval: 300 seconds
 Rate                               RX                   TX        Total (RX+TX)
 ---------------- -------------------- -------------------- --------------------
 Mbits / sec                      0.00                 0.00                 0.00
 KPkts / sec                      0.00                 0.00                 0.00
   Unicast                        0.00                 0.00                 0.00
   Multicast                      0.00                 0.00                 0.00
   Broadcast                      0.00                 0.00                 0.00
 Utilization %                    0.00                 0.00                 0.00
 Statistic                          RX                   TX                Total
 ---------------- -------------------- -------------------- --------------------
 Packets                      44814622             59237172            104051794
   Unicast                    32884758             54916384             87801142
   Multicast                   3252586              1565911              4818497
   Broadcast                   8677278              2754877             11432155
…
More – next page:Space, next line:Enter, quit:q
시스템 상태와 관련된 명령어
AOS-CX는 “show system” 명령어를 사용하여 스위치 상태와 같은 가시성을 확인할 수 있습니다.
switch# show system ?
  interface-group       Show interface group information
  inventory             Show installed hardware information
  resource-utilization  Utilization of various system resources
  serviceos             Display serviceOS information
  <cr>
스위치의 종류라든가 시리얼 번호, 펌웨어 정보들 역시 해당 명령어에서 모두 확인 가능합니다.
switch(config-if)# show system
Hostname               : 6300-switch
System Description     : FL.10.13.0001AV
System Contact         :
System Location        :

Vendor                 : Aruba
Product Name           : JL660A 6300M 24SR5 CL6 PoE 4SFP56 Sw
Chassis Serial Nbr     : SG9BKMZ05C
Base MAC Address       : 883a30-aae100
ArubaOS-CX Version     : FL.10.13.0001AV

Time Zone              : US/Pacific

Up Time                : 8 weeks, 6 days, 1 hour, 9 minutes
CPU Util (%)           : 6
CPU Util (% avg 1 min) : 15
CPU Util (% avg 5 min) : 13
Memory Usage (%)       : 21
inventory 명령어를 사용하면, 전원공급장치(PSU), 팬(FAN), 라인 카드 등 기타 모듈 정보를 확인할 수 있습니다.
switch# show system inventory
Type                 Location Product    Description                                        Serial           Hardware
                              Number                                                         Number           Version
-------------------- -------- ---------------- -------------------------------------------------- ---------------
Chassis              1        JL661A      6300M 48-port 1GbE Class 4 PoE and 4-port SFP56... SG90KN009Q       3
Power Supply         1/1      JL670A      Aruba X372 54VDC 1600W PS                          CN9AKN8128       01
Fan Tray             1/1      JL669A      X751 FB Fan Tray                                   CN99KN91P3       1
No matching interfaces
capacities 명령어를 사용하면, 스위치에서 제공하는 기능이나 서비스의 용량을 보여줍니다.
switch# show capacities ?
  active-gateway-extended-vmacs    Filter Active Gateways extended router macs entreies.
  active-gateway-vmacs             Filter Active Gateways vmacs entries.
  bfd                              Filter BFD entries.
  bgp                              Filter BGP entries.
  classifier                       Filter Classifier entries.
  client-insight-client-limit      Filter Client-Insight client limit entries.
  client-track-ip-client-limit     Filter maximum clients for tracking the IP address entries.
  containers                       Filter CONTAINERS entries.
  … …
예를 들면, OSPFv2나 LAG(Link Aggregation Group)의 용량을 확인해볼 수 있습니다.
switch# show capacities ospfv2

System Capacities: Filter OSPFv2
Capacities Name                                                   Value
-----------------------------------------------------------------------
Maximum number of OSPFv2 areas configurable in the system           128
Maximum number of OSPFv2 interfaces configurable in the system      128
Maximum number of OSPFv2 interfaces per area in the system          128
Maximum number of OSPFv2 neighbors allowed across all VRFs          128
Maximum number of OSPFv2 processes supported across each VRF          8
Maximum number of routes in OSPFv2 supported across all VRFs     128000
switch# show capacities lag
System Capacities: Filter LAG
Capacities Name Value
--------------------------------------------------------------
Maximum number of configurable LAG ports 64
Maximum number of members supported by a LAG port 8CPU와 메모리의 리소스 사용량을 확인하기 위해서는 top 명령어를 사용합니다.
switch# top cpu
top - 21:24:20 up 5 days, 23:20,  1 user,  load average: 0.29, 0.43, 0.46
Tasks: 306 total,   1 running, 305 sleeping,   0 stopped,   0 zombie
%Cpu(s):  4.3 us,  4.3 sy,  0.0 ni, 91.3 id,  0.0 wa,  0.0 hi,  0.0 si,  0.0 st
MiB Mem :   7603.6 total,   1639.2 free,   1784.9 used,   4179.5 buff/cache
MiB Swap:   2048.0 total,   2048.0 free,      0.0 used.   5633.9 avail Mem

    PID USER      PR  NI    VIRT    RES    SHR S  %CPU  %MEM     TIME+ COMMAND
2436717 admin     20   0    3548   2260   1664 R  25.0   0.0   0:00.05 /usr/bin/top -b -n 2 -c -o %CPU -w 11+
   1093 root      20   0 2547800 236204 123528 S   8.3   3.0 483:34.85 /usr/bin/switchd_agent -i 1 -s 1 -p 1+
   3194 root      20   0  133960  23876  17788 S   8.3   0.3  31:26.93 /usr/bin/hpe-mgmdd --detach --pidfile+
      1 root      20   0  161784  11404   6112 S   0.0   0.1   2:35.00 /sbin/init
      2 root      20   0       0      0      0 S   0.0   0.0   0:00.25 [kthreadd]
switch# top memory
top - 21:25:15 up 5 days, 23:21,  1 user,  load average: 0.48, 0.45, 0.46
Tasks: 305 total,   3 running, 302 sleeping,   0 stopped,   0 zombie
%Cpu(s): 28.6 us,  4.1 sy,  0.0 ni, 67.3 id,  0.0 wa,  0.0 hi,  0.0 si,  0.0 st
MiB Mem :   7603.6 total,   1637.9 free,   1786.0 used,   4179.7 buff/cache
MiB Swap:   2048.0 total,   2048.0 free,      0.0 used.   5632.6 avail Mem

    PID USER      PR  NI    VIRT    RES    SHR S  %CPU  %MEM     TIME+ COMMAND
   1093 root      20   0 2547800 236204 123528 S   8.3   3.0 483:37.95 /usr/bin/switchd_agent -i 1 -s 1 -p 1+
    958 root      20   0 1660828 170824  26136 S   0.0   2.2  19:02.88 /usr/bin/hpe-restd
   2987 root      20   0 1493804 131632  20440 S   0.0   1.7  17:26.64 /usr/bin/yang-resolverd -ip-address l+
   2855 root      20   0  164752 103252  27440 S   0.0   1.3   0:38.09 /usr/bin/arcd-dpi-engine --pidfile -v+
   4327 root      20   0  270884 100548  46240 S   0.0   1.3  91:27.55 /usr/bin/hpe-routing --detach --pidfi+
마지막으로 스위치의 OS 이미지는 “show image” 명령어로 확인 가능합니다.
현재 운용 중인 OS 펌웨어 버전과 해시값 등의 이미지 정보와 백업 이미지 정보 등을 확인할 수 있습니다.
switch# # show images
---------------------------------------------------------------------------
ArubaOS-CX Primary Image
---------------------------------------------------------------------------
Version : FL.10.10.1010
Size    : 920 MB
Date    : 2022-09-21 17:34:10 UTC
SHA-256 : 5bf4bdc799e5f879209f249fb86b1cc0518a446178dae6c646a116ff1c814035
---------------------------------------------------------------------------
ArubaOS-CX Secondary Image
---------------------------------------------------------------------------
Version : FL.10.13.0001AV
Size    : 983 MB
Date    : 2023-09-19 12:11:31 UTC
SHA-256 : df4f8fc3ef7758c30edd0141d0830fdc1563e443530c29d7768f769611be6e51

Default Image : secondary
Boot Profile Timeout : 5 seconds

------------------------------------------------------
Management Module 1/1 (Active)
------------------------------------------------------
Active Image       : secondary
Service OS Version : FL.01.14.0002
BIOS Version       : FL.01.0002
이번 포스팅에서는 간단하게 CLI 터미널로 접속하는 방법과 기본적인 명령어 체계, show 명령어에 대해 알아보았습니다.
다음에는 보다 VLAN이나 OSPF 등의 실제 스위치를 구성하는 명령어를 알아보도록 하겠습니다.


